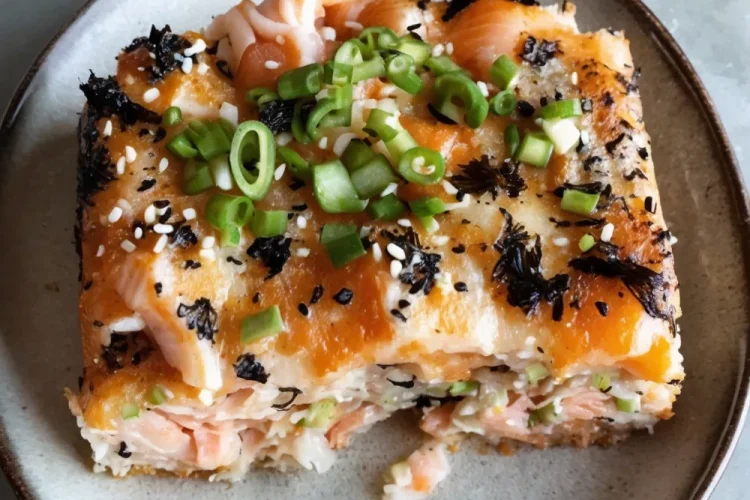
Love sushi but want an easier way to enjoy it? This Spicy Salmon Sushi Bake is a Healthy Sushi Casserole that delivers all the vibrant flavors of sushi without the fuss of rolling. Packed with creamy salmon, sushi rice, and a spicy kick, it’s perfect for family dinners, meal prep, or casual gatherings. Make this Spicy Salmon Sushi Bake for a wholesome, crowd-pleasing dish that’s as delicious as it is simple!
Why You’ll Love Spicy Salmon Sushi Bake
I can’t get enough of this Spicy Salmon Sushi Bake because it’s a Healthy Sushi Casserole that combines the best of sushi rolls with the ease of a casserole. The tender salmon, creamy mayo-sriracha mix, and nutty sesame toppings create a flavor explosion, while the straightforward prep makes it ideal for busy nights. This Healthy Sushi Casserole is customizable, nutritious, and looks impressive, making it a go-to for any sushi lover!
Ingredients for Spicy Salmon Sushi Bake
Here’s what you’ll need for Spicy Salmon Sushi Bake (serves 6–8):
- 1 lb fresh salmon (skinless)
- 2 cups sushi rice
- 2 tbsp rice vinegar
- 1 tbsp sugar
- ½ cup mayonnaise (preferably Japanese mayo)
- 2 tbsp sriracha sauce (adjust for spice level)
- 1 avocado, sliced
- ¼ cup green onions, chopped
- 1 sheet nori (seaweed), cut into strips
- Sesame seeds for garnish
- Soy sauce for serving
Equipment
- Medium saucepan (for rice)
- Baking sheet (for salmon)
- 9×9-inch baking dish
- Parchment paper
- Mixing bowl
- Fork (for flaking salmon)
- Spatula
- Airtight container for storage
Ingredient Tips
- Salmon: Use sushi-grade salmon for the best flavor; frozen salmon works if thawed properly.
- Sushi Rice: Rinse well before cooking to remove excess starch for sticky texture.
- Mayonnaise: Japanese mayo (like Kewpie) adds richness; regular mayo works too.
- Sriracha: Adjust to taste for milder or spicier results; substitute with hot sauce if needed.
- Nori: Cut into thin strips with scissors for easy topping.
Directions for Spicy Salmon Sushi Bake
Let’s create this Spicy Salmon Sushi Bake!
Cook the Sushi Rice
- I cook 2 cups sushi rice according to package instructions.
- Once done, I mix in 2 tbsp rice vinegar and 1 tbsp sugar, stirring until combined.
- I set it aside to cool slightly.
Prepare the Salmon
- I preheat the oven to 375°F (190°C) and line a baking sheet with parchment paper.
- I place 1 lb skinless salmon on the sheet and bake for 10–12 minutes, until it flakes easily with a fork.
- I flake the cooked salmon into small pieces in a bowl, then mix in ½ cup mayonnaise and 2 tbsp sriracha to create a creamy, spicy mixture.
Assemble the Bake
- In a 9×9-inch baking dish, I spread the cooled sushi rice evenly across the bottom.
- I top it with the spicy salmon mixture, spreading it smoothly over the rice.
Bake and Garnish
- I bake the Spicy Salmon Sushi Bake for 15–20 minutes, until the top is slightly golden and bubbly.
- After cooling for a few minutes, I top it with sliced avocado, ¼ cup chopped green onions, nori strips, and a sprinkle of sesame seeds.
Serve
- I serve the Spicy Salmon Sushi Bake warm with soy sauce on the side, scooping portions into bowls or onto plates for 6–8 servings.
Nutrition
- Prep Time: 20 minutes
- Cook Time: 25 minutes
- Total Time: 45 minutes
- Servings: 4
- Calories: ~350 kcal per serving (based on 8 servings)
- Macros per Serving: 40g carbs, 15g protein, 15g fat, 2g fiber
Variations for Spicy Salmon Sushi Bake
Try these twists on Spicy Salmon Sushi Bake:
- Tuna Swap: Replace salmon with tuna for a different Healthy Sushi Casserole flavor.
- Vegetarian: Use mashed tofu or roasted mushrooms instead of salmon for a veggie Healthy Sushi Casserole.
- Extra Crunch: Top with panko breadcrumbs mixed with 1 tsp melted butter before baking.
- Mild Version: Skip sriracha and use plain mayo with a dash of soy sauce.
- Spicy Boost: Add ½ tsp chili flakes or a drizzle of chili oil for extra heat.
Serving Ideas:
- Pair with Layla Cooks’ Crab Rangoon Bombs for a seafood-themed appetizer spread.
- Serve with a side of Layla Cooks’ miso soup to complement the Healthy Sushi Casserole.
- Offer at a dinner party with mango iced tea for a refreshing touch.
Storage
I store Spicy Salmon Sushi Bake in an airtight container in the refrigerator for up to 2 days. To reheat, I place it in a 350°F oven for 10 minutes to warm through, avoiding the microwave to maintain texture. Due to the seafood content, I don’t recommend freezing, as it may affect the rice and avocado quality.
Serving Tips
- Presentation: Scoop Spicy Salmon Sushi Bake into bowls and garnish with extra nori strips or sesame seeds for a vibrant look.
- Garnish: Add pickled ginger or sliced cucumber for a classic sushi vibe.
- Pairing: Enjoy with green tea or a light sake to enhance the Healthy Sushi Casserole.
- Portion Size: One scoop (1/8 of dish) per person for a satisfying meal.
- Occasions: Perfect for family dinners, meal prep, or casual gatherings.
FAQs
Can I use cooked salmon?
Yes, you can use cooked salmon if you prefer. Just flake it into small pieces and combine with the mayo and sriracha as usual.
Can I make this ahead of time?
Yes! You can assemble the sushi bake up to 24 hours in advance and store it in the fridge. Just bake it when you’re ready to serve.
What can I use if I don’t have sushi rice?
You can use any short-grain rice or even brown rice if sushi rice isn’t available. Just be sure to season it with rice vinegar and sugar to get that signature sushi flavor.
Can I make this recipe without sriracha?
Certainly! If you prefer a milder version, you can skip the sriracha and just mix the salmon with mayonnaise, or use a different type of sauce such as a sweet chili sauce.
Can I make this vegetarian?
Yes, swap the salmon for mashed tofu or roasted vegetables for a vegetarian Spicy Salmon Sushi Bake alternative.
Can I freeze leftovers?
Due to the rice and avocado, freezing is not ideal, but you can refrigerate leftovers for up to 2 days and reheat in the oven for best results.
More Delicious Appetizer Recipes You’ll Love
- Crispy Parmesan Asparagus Sticks
- Air Fryer Eggplant Asian Style
- Smoked Mexican Street Corn Dip
- Leftover Mashed Potato Cheese Puffs

Conclusion
This Spicy Salmon Sushi Bake is a fun and easy way to enjoy sushi at home. It’s a Healthy Sushi Casserole that’s packed with flavor, and it’s perfect for anyone who loves sushi but doesn’t want to spend time rolling it. Whether you’re cooking for a crowd or just enjoying a cozy dinner, this dish is sure to be a hit.
Spicy Salmon Sushi Bake Recipe
Ingredients
- 1 lb fresh salmon skinless
- 2 cups sushi rice
- 2 tbsp rice vinegar
- 1 tbsp sugar
- 1/2 cup mayonnaise preferably Japanese mayo
- 2 tbsp sriracha sauce adjust for spice level
- 1 avocado sliced
- 1/4 cup green onions chopped
- 1 sheet nori seaweed, cut into strips
- Sesame seeds for garnish
- Soy sauce for serving
Instructions
- Prepare the Sushi Rice: Cook the sushi rice according to the package instructions. Once cooked, season with rice vinegar and sugar, mixing until well combined. Set aside to cool slightly.
- Prepare the Spicy Salmon: Preheat the oven to 375°F (190°C). Bake the salmon on a parchment-lined baking sheet for 10-12 minutes, or until fully cooked and flakes easily with a fork. Flake the salmon into small pieces and mix with mayonnaise and sriracha sauce.
- Assemble the Sushi Bake: In a 9×9-inch baking dish, spread an even layer of sushi rice. Top with the spicy salmon mixture, spreading it evenly over the rice.
- Bake: Place the dish in the oven and bake for 15-20 minutes, or until the top is slightly golden and bubbly.
- Serve: Remove from the oven and let it cool for a few minutes. Top with sliced avocado, green onions, and strips of nori. Garnish with sesame seeds and serve with soy sauce.
Notes
- Use high-quality salmon: Fresh, sushi-grade salmon is best for this dish.
- Customize your toppings: Add your favorite sushi toppings such as cucumber, pickled ginger, or eel sauce for extra flavor.
- Make it vegetarian: Replace the salmon with tofu or roasted vegetables for a plant-based version.
- For a crunchy topping: Add panko breadcrumbs mixed with butter to the top before baking for a crispy finish.
Did you Like This Recipe? Please Rate and Comment Below!