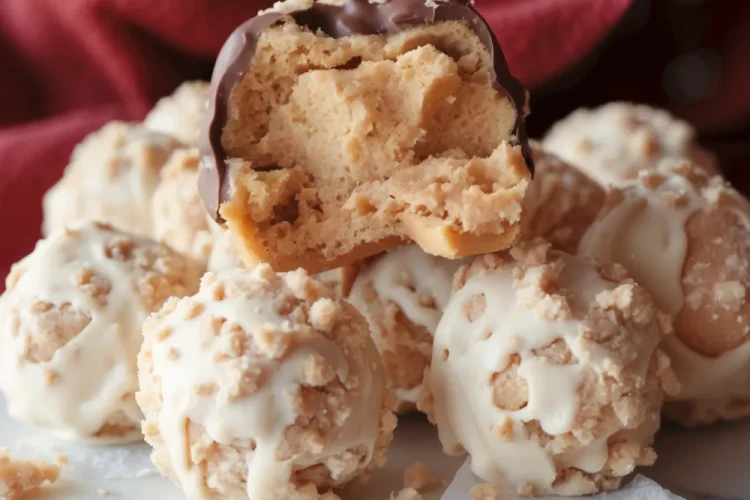
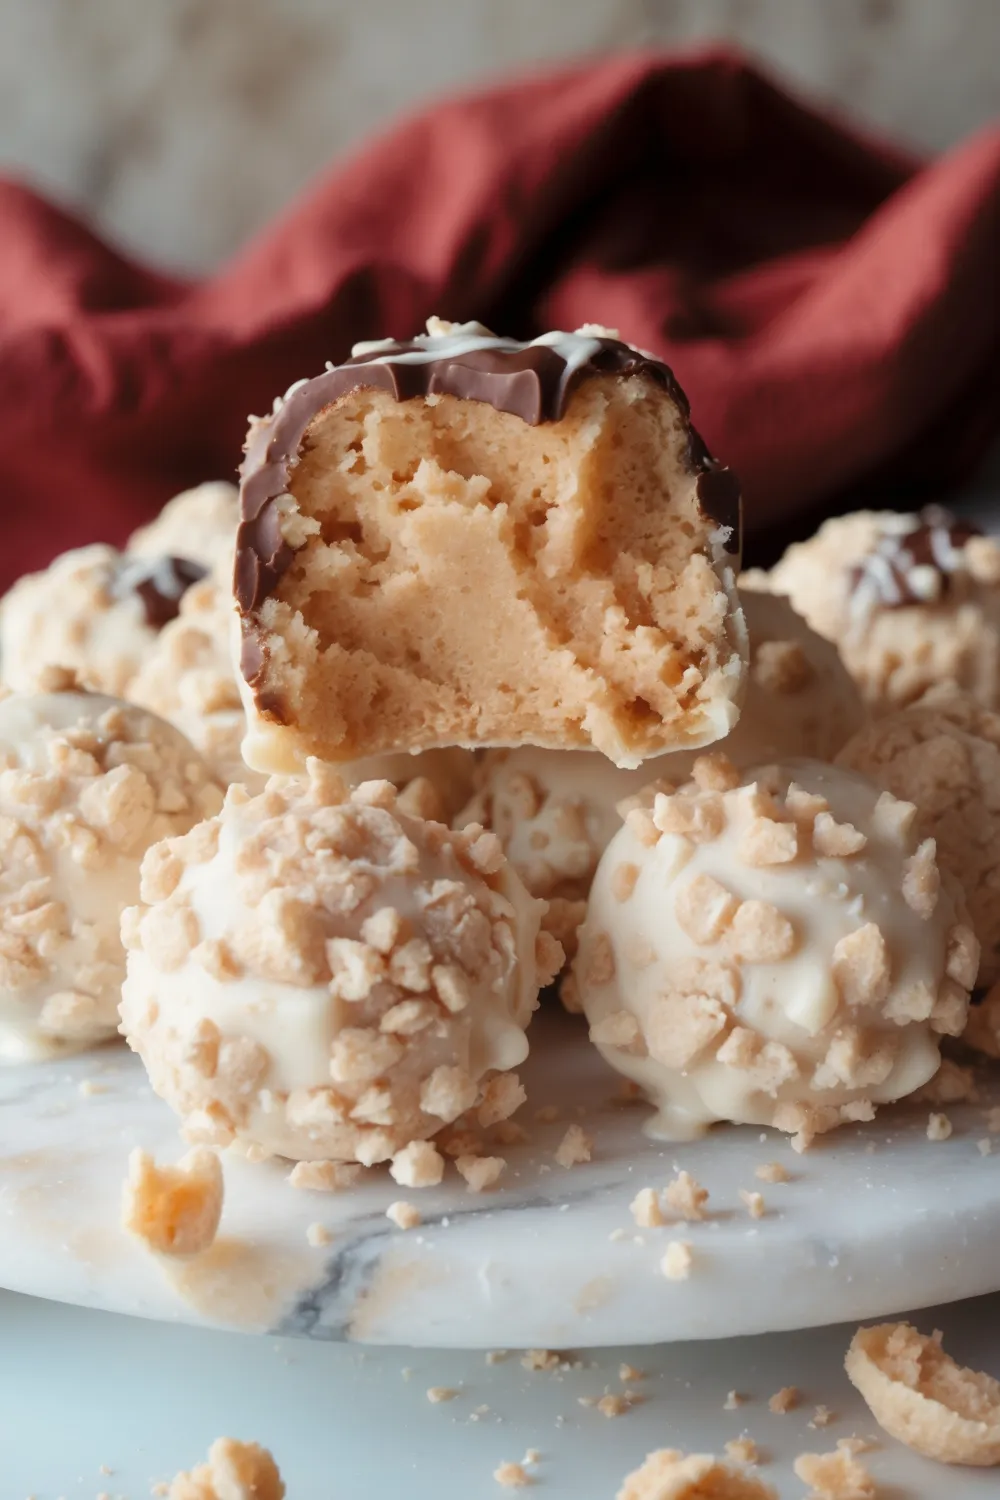
Nutter Butter Balls are a sweet, creamy Peanut Butter Delight that’s easy to make and utterly delicious. These peanut butter cookie truffles, coated in rich chocolate, create a bite-sized indulgence perfect for any occasion. Whether you’re prepping for a holiday party, a special event, or just want a treat to share with loved ones, these truffles are sure to steal the show.

Why You’ll Love Nutter Butter Balls
I’m hooked on this Nutter Butter Balls recipe because it combines the irresistible crunch of peanut butter cookies with a creamy, dreamy filling, making it a true Peanut Butter Delight. The smooth chocolate coating adds a decadent touch, while the simple prep makes it a breeze to whip up. These truffles are ideal for gifting, serving at gatherings, or satisfying a sweet craving at home. Their rich, nutty flavor and perfect texture make them a guaranteed crowd-pleaser.
Ingredients for Nutter Butter Balls
Here’s what you’ll need for Nutter Butter Balls (makes ~30 truffles):
- 16 oz package Nutter Butter cookies (or similar peanut butter cookies)
- 4 oz cream cheese, softened
- ¾ cup creamy peanut butter
- 16 oz melting chocolate (milk, dark, or white)
- Optional: sprinkles or chopped peanuts for garnish
Equipment:
- Food processor
- Baking sheet
- Wax or parchment paper
- Small cookie scoop (optional)
- Double boiler or microwave-safe bowl
Ingredient Tips:
- Cookies: Nutter Butters for authentic flavor; any crunchy peanut butter cookie works.
- Cream Cheese: Full-fat for richness; soften at room temp for easy blending.
- Peanut Butter: Creamy for smooth texture; natural peanut butter may separate.
- Chocolate: Use high-quality melting wafers for smooth coating; add 1 tsp coconut oil if too thick.
- Garnish: Seasonal sprinkles for festive flair; chopped peanuts for extra crunch.
Directions for Nutter Butter Balls
Let’s create these irresistible Nutter Butter Balls!
Crush the Cookies
In a food processor, I pulse the 16 oz package of Nutter Butter cookies until they form fine crumbs, creating a flavorful base for the truffles.
Make the Dough
I add 4 oz softened cream cheese and ¾ cup creamy peanut butter to the cookie crumbs in the food processor, processing until a smooth, cohesive dough forms.
Form the Balls
Using a small cookie scoop or my hands, I roll the dough into 1-inch balls (~30 total). I place them on a baking sheet lined with wax paper and freeze for 30 minutes to firm up.
Dip in Chocolate
I melt 16 oz melting chocolate according to package instructions (microwave in 30-second intervals or use a double boiler). I dip each frozen Nutter Butter Ball into the chocolate, coating completely, and return them to the wax paper.
Garnish and Set
Before the chocolate sets, I sprinkle the Nutter Butter Balls with optional sprinkles or chopped peanuts for extra flair. I let the chocolate harden at room temperature or refrigerate for 15 minutes to speed up the process.
Nutrition
- Prep Time: 20 minutes
- Chill Time: 30 minutes
- Total Time: 50 minutes
- Yield: ~30 truffles
- Calories: ~120 kcal per truffle
- Macros per Truffle: 10g carbs, 3g protein, 8g fat, 1g fiber
Variations for Nutter Butter Balls
Try these twists on Nutter Butter Balls:
- Chocolate Swap: Use white or dark chocolate for a different Peanut Butter Delight flavor.
- Nut Crunch: Mix ¼ cup chopped peanuts into the dough for a textured Peanut Butter Delight.
- Cookie Swap: Replace Nutter Butters with Oreos for a chocolatey twist.
- Spiced Kick: Add ¼ tsp cinnamon to the dough for a warm, cozy note.
- Dairy-Free: Use dairy-free cream cheese and vegan chocolate for an allergen-friendly option.
Serving Ideas:
- Pair with Layla Cooks’ Condensed Milk ANZAC Biscuit Slab for a diverse dessert spread.
- Serve with a glass of cold milk or coffee to complement the Peanut Butter Delight.
- Include in holiday cookie tins for a thoughtful gift.
Storage
I store Nutter Butter Balls in an airtight container at room temperature for up to 1 week in a cool, dry place. For a firmer texture or longer storage, I refrigerate them for up to 3 weeks. To freeze, I arrange truffles in a single layer on a baking sheet to freeze individually, then transfer to a freezer-safe container for up to 3 months. I thaw in the refrigerator for a few hours before serving, ensuring an airtight seal to prevent moisture from affecting the chocolate.
Serving Tips
- Presentation: Arrange Nutter Butter Balls in mini paper liners or on a festive platter for a charming display.
- Temperature: Serve at room temperature for the creamiest texture; let refrigerated truffles sit out for 5–10 minutes.
- Garnish: Add sprinkles or chopped peanuts before chocolate sets for color and crunch.
- Portioning: Offer as bite-sized treats for easy sharing at parties or dessert tables.
- Pairing: Serve with fresh fruit like strawberries to balance the richness.
FAQs About Nutter Butter Balls
Here are answers to some common questions about this recipe:
Can I use other types of cookies for this recipe?
Yes, you can use other types of cookies if Nutter Butters are not available. Any peanut butter cookie or similar flavor will work well in this recipe. Just make sure the cookies are crunchy enough to create fine crumbs for the dough.
How do I get a smooth chocolate coating?
To achieve a smooth chocolate coating, ensure that the melting chocolate is thoroughly melted and free of lumps. Stir the chocolate frequently while melting, either in a microwave or using a double boiler. If the chocolate is too thick, you can add a small amount of coconut oil or shortening to thin it out, which helps it coat the truffles more smoothly.
Can I make Nutter Butter Balls in advance?
Yes, Nutter Butter Balls can be made ahead of time. They can be stored in an airtight container at room temperature for up to a week, in the refrigerator for up to three weeks, or in the freezer for up to three months. If freezing, make sure to thaw them in the refrigerator before serving.
What can I use as a substitute for cream cheese in this recipe?
If you need a substitute for cream cheese, you can use mascarpone cheese, Greek yogurt, or even a non-dairy cream cheese alternative. Each option will provide a similar creamy texture, though the flavor may vary slightly.
Can I use crunchy peanut butter instead of creamy?
Yes, crunchy peanut butter can be used for a bit of extra texture in the Nutter Butter Balls. It won’t affect the dough’s consistency significantly, but it will add small nut pieces for a subtle crunch.
More Summer Dessert Ideas You’ll Love
- Chocolate Mousse Cake
- Cinnamon Sugar Blondies
- Strawberry Shortcake Cake (with sponge cake)
- Moist Cinnamon Apple Cake: A Sweet, Simple Deligh

Conclusion
These Nutter Butter Balls are a delightful combination of crunchy cookie, creamy peanut butter, and smooth chocolate, making them a crowd-pleaser that’s both satisfying and easy to prepare. Perfect for gifting or serving at your next gathering, these truffles will quickly become a favorite treat.
Nutter Butter Balls
Ingredients
- 16 oz. package Nutter Butters or similar peanut butter cookies
- 4 oz. cream cheese softened
- ¾ cup creamy peanut butter
- 16 oz. melting chocolate
- Optional: sprinkles or chopped peanuts
Instructions
- Crush the Cookies: Pulse Nutter Butters in a food processor until they turn into fine crumbs.
- Prepare the Dough: Add softened cream cheese and creamy peanut butter to the crumbs. Process until a smooth dough forms.
- Form the Balls: Roll the dough into 1-inch balls and place on a baking sheet lined with wax paper. Freeze for 30 minutes.
- Dip in Chocolate: Melt the chocolate according to package instructions. Dip each frozen ball into the melted chocolate, covering completely, and return to the wax paper.
- Garnish: Optionally, sprinkle with sprinkles or chopped peanuts before the chocolate sets.
- Set and Store: Allow the chocolate to harden completely at room temperature or in the refrigerator before storing in an airtight container.
Notes
- If the dough is too soft, chill it briefly before rolling into balls.
- For a smooth chocolate coating, ensure the chocolate is thoroughly melted and consider adding a bit of coconut oil if needed.
- Store in an airtight container to maintain freshness and avoid moisture affecting the chocolate coating.
Did you Like This Recipe? Please Rate and Comment Below!